The Ultimate Setup Guide for Your Osmo Action
The introduction of the DJI Osmo Action series marked a significant shift in the action camera landscape. For years, the market was dominated by a single name, but the Osmo Action brought a fresh perspective on what a rugged, compact camera could achieve. Whether you are capturing high-octane downhill mountain biking, documenting a serene diving expedition, or starting a professional vlog, the setup process is the foundation of your success. This guide provides an exhaustive look at how to optimize your device from the moment you unbox it to the second you hit the record button in the field.
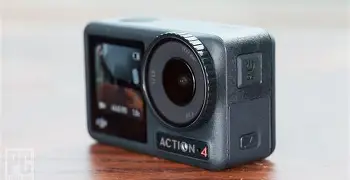
Detailed Product Analysis: The Osmo Action Philosophy
At its core, the Osmo Action is designed around efficiency and durability. The engineering focuses on solving the primary pain points of action photography: stability, heat management, and ease of use. One of the standout features that redefined the category was the inclusion of dual screens. While rear screens have been standard, the addition of a high-quality front-facing screen allowed creators to frame themselves accurately without needing external monitors or guesswork. This single design choice made it a favorite for the vlogging community.
Beyond the screens, the camera’s RockSteady technology represented a leap forward in Electronic Image Stabilization (EIS). Unlike traditional stabilization that often results in a "jello" effect or heavy cropping, the Osmo Action’s algorithms analyze frame-by-frame data to provide fluid motion that mimics a physical gimbal. The lens design is equally deliberate, featuring three aspherical layers that reduce distortion and glare, ensuring that even under direct sunlight, the image remains crisp and usable.
Durability is another pillar of this device. The camera is waterproof without an external housing to significant depths, and the lens cover is treated with an anti-fingerprint coating that also repels oil and water. This is a critical detail for users transitioning between water and air, as it prevents droplets from ruining a "once-in-a-lifetime" shot. The cooling system is also noteworthy; a dedicated heat sink allows the camera to record at high bitrates for extended periods without the thermal shutdowns that plague many smaller electronics.
Pros and Cons of the Osmo Action System
- Pros: Exceptional front-panel display for self-framing and vlogging.
- Pros: RockSteady stabilization provides professional-grade smoothness without a gimbal.
- Pros: Robust build quality that handles extreme temperatures and underwater environments natively.
- Pros: Voice control features allow for hands-free operation during intense activities like climbing or skiing.
- Pros: Quick Switch (QS) button makes navigating modes and custom profiles instantaneous.
- Pros: De-warp functionality effectively removes the "fisheye" distortion typical of wide-angle lenses.
- Cons: Low-light performance, while respectable, cannot compete with larger sensor bridge or DSLR cameras.
- Cons: The proprietary battery system requires carrying multiple spares for full-day shoots.
- Cons: A slight crop factor is applied when the highest levels of stabilization are active.
- Cons: The user interface, while intuitive, can feel cramped on the small rear touchscreen for users with larger hands.
Unboxing and Initial Configuration
The first step in your setup journey involves the physical preparation of the unit. Ensure that the battery is fully seated; the Osmo Action uses a dual-locking mechanism where orange indicators disappear once the battery is correctly clicked into place. This is essential for maintaining the waterproof seal. Once powered on, the camera will prompt you for activation via a mobile application. During this stage, it is vital to check for firmware updates. DJI frequently releases patches that improve stabilization algorithms, battery efficiency, and even add new shooting modes.
After activation, navigate to the system settings to configure your base preferences. Set your language, date, and time, but more importantly, adjust the "Auto-Off" and "Screen Auto-Sleep" timers. For action sports, you want a quick sleep timer to save battery, but a longer auto-off timer so the camera is ready to wake up instantly when you press the shutter. Turning off unnecessary sounds and the LED status lights can also extend battery life and make the camera less conspicuous if you are filming in public spaces.
Optimizing Video and Audio Settings
The Osmo Action offers a variety of resolutions and frame rates, but "highest" isn't always "best." For most cinematic work, 4K at 24 or 30 frames per second is the gold standard. However, if you intend to slow down your footage in post-production, 4K at 60fps or 1080p at 240fps (for super slow motion) should be your target. A common mistake is leaving the camera in "Auto" mode for everything. For professional results, switch to "Manual" or "Pro" mode. This allows you to lock the shutter speed—ideally at double your frame rate (the 180-degree rule)—and control your ISO to prevent grainy footage in shaded areas.
Color profiles are equally important. If you plan on color grading your footage, use the "D-Cinelike" profile. This captures a flatter image with more dynamic range, allowing you to pull more detail out of the shadows and highlights later. If you want a "ready-to-share" look, the standard profile provides vibrant colors and excellent contrast right out of the camera. Finally, don't ignore audio. While the built-in microphones are decent and feature wind noise reduction, using a USB-C to 3.5mm adapter for an external lavalier microphone will transform the quality of your vlogs.
Discover deals on Electronics — updated daily.
View Offers →Real-World Comparison: Osmo Action vs. Standard Competitors
To understand where the Osmo Action sits in the market, it is helpful to look at how its technical specifications compare to the average high-end action camera expectations of this era.
| Feature | Osmo Action | Standard Industry Rival |
|---|---|---|
| Front Display | 1.4-inch Full Color (Interactive) | Monochrome / Non-Interactive Status Screen |
| Stabilization | RockSteady (Advanced EIS) | Standard Digital Stabilization |
| HDR Video | Supported up to 4K/30fps | Limited to lower resolutions |
| Waterproofing | 11 Meters (Native) | 10 Meters (Native) |
| Lens Protection | Removable/Replaceable Cap | Fixed Lens (Often requires repair) |
| Max Bitrate | 100 Mbps | 60-80 Mbps |
Advanced Setup: Custom Modes and Shortcuts
One of the most powerful yet underutilized features of the Osmo Action is the Custom (C1-C5) mode system. Action environments change rapidly. You might be filming a high-speed descent one minute and a slow-motion detail shot of a trail the next. By using the Quick Switch button, you can toggle between these presets without touching the screen. To set this up, configure the camera exactly how you want it for a specific scenario—for example, 1080p/120fps with RockSteady on for "Slow Motion"—then save it to a custom slot. Repeat this for "Vlog" (4K/30, Front Screen Priority) and "Timed Lapse."
The "SnapShot" feature is another setup priority. In the settings menu, enable SnapShot to allow the camera to begin recording the moment you press the shutter button, even if the camera is completely powered off. This ensures you never miss a fleeting moment because you were waiting for the UI to boot up. Usually, the camera can go from "off" to "recording" in under two seconds with this feature active.
The Buying Guide: Selecting the Right Accessories
Setting up the camera body is only half the battle; the gear you surround it with determines the versatility of your kit. Buyers should prioritize quality over quantity when it comes to accessories. The most critical "external" part of your setup is the microSD card. Due to the 100Mbps bitrate, you must use a card with a V30 or UHS-I Speed Class 3 rating. Using an inferior card will lead to "Write Error" messages and corrupted files, which is a devastating way to end a shoot.
Next, consider your mounting strategy. The Osmo Action is compatible with most standard two-prong action camera mounts, but the included "Camera Frame" is essential for protection and mounting. For water-related activities, a "floaty" handle is a must-have to prevent the camera from sinking if dropped. For land-based creators, a magnetic quick-release system can save time when switching the camera between a chest mount and a tripod. ND (Neutral Density) filters are also a signature accessory for the Osmo Action. Because the lens cover is removable, you can screw on ND filters to reduce light intake, allowing for a slower shutter speed and more natural motion blur in bright daylight.
Maintenance and Longevity Tips
A professional setup includes a maintenance routine. After every use in salt water, the camera must be rinsed in fresh water for several minutes to prevent salt crystals from damaging the seals or the microphones. The lens cap should be checked for smudges before every shoot; even a tiny fingerprint can cause massive light flaring that ruins your contrast. Additionally, manage your batteries by rotating them. Number your batteries with a small piece of tape or a marker so you use them evenly over time, which helps maintain their chemical health and ensures you aren't overworking a single unit.
Storage is the final step. When the camera is not in use for more than a few days, remove the battery. Lithium-ion batteries can swell if left in a device in hot or humid conditions. Storing the camera in a hard-shell, padded case—even a small one—protects the screens from pressure damage. Action cameras are built to be tough, but treating them with the respect often reserved for high-end cinema cameras will ensure they remain reliable for years of service.
Find top-rated Electronics products at great prices.
View Offers →Optimizing the Osmo Action for Specific Use Cases
To truly get the most out of your setup, it is helpful to specialize your settings based on what you are capturing. No single configuration works for every environment, and understanding the nuances of different activities will elevate your footage from amateur clips to professional-grade content.
The Mountain Biking Setup
For high-vibration activities like mountain biking, stabilization is the priority. Set the camera to 4K/60fps. The higher frame rate allows for smoother motion during fast descents and gives you the option for slight slow-motion if you hit a jump. Use the "SuperWide" field of view to capture more of the handlebars and the trail ahead, providing a sense of speed and scale. In terms of mounting, a chest mount is often superior to a helmet mount as it provides a more stable point of reference (your torso) and captures the movement of the bike's front end.
The Diving and Snorkeling Setup
Water absorbs colors, specifically reds and oranges, as you go deeper. When setting up for underwater use, utilize the camera’s built-in HDR (High Dynamic Range) video mode. This helps preserve detail in the bright surface water while pulling detail out of the darker depths. If you are diving below five meters, consider an external red filter to bring back the natural color balance. Ensure that the "Touchscreen Lock" is active before submerging, as water pressure and movement can accidentally trigger menu changes on the rear screen.
The Vlogging and Social Media Setup
For creators, the dual-screen setup is the star. Set your front screen to "Full Screen" mode so you can see your entire composition clearly. Use a 1080p or 2.7K resolution if you need to prioritize battery life and storage space for long talking-head segments. Activate "Face Oriented Exposure." This setting tells the camera’s light meter to prioritize the exposure of your face over the background, preventing you from becoming a silhouette when filming with the sun behind you. This is a crucial setting for "run-and-gun" creators who don't have time to adjust exposure manually.
Conclusion
The Osmo Action is more than just a piece of electronics; it is a gateway to capturing the world in its most dynamic states. By taking the time to move beyond the default settings and truly understanding the synergy between resolution, stabilization, and manual control, you unlock the camera's full potential. A successful setup is one that balances technical precision with the simplicity required to stay present in the moment. Whether you are adjusting your RockSteady levels for a rugged hike or fine-tuning your C-Cinelike profile for a cinematic travel film, the effort you put into your initial configuration pays dividends in the editing room. With a solid foundation of settings, the right accessories, and a consistent maintenance routine, your Osmo Action becomes a reliable partner for every adventure you embark upon.